My first drone-build is finished, configured and tested!
Here is update 3 in my series on how I build my very first FPV drone. The learning curve is steep and I encounter new challenges all the time, but it is fun to see that I always get through the problems with the help of forums like Quadcopterforum and YouTube movies. It is remarkable that whatever question I have there is almost always someone who has made a tutorial on it! Also, check out the test flight videos at the bottom.
These are the two previous articles in this drone building series:
1. I have decided to build my first FPV Racing Drone!
2. Starting the right way.
3. Assembling and finishing the drone! (this article)
Update on FPV Simulator training
In between building on the drone and when I wait for answers to difficult questions, I have continued practicing with my Taranis Q X7 transmitter and simulators. I have now bought Velocidrone, RotorRush and finally LiftOff. There are many simulators out there but the recommendations on YouTube, drone blogs, and forums didn’t actually turn out to be true. At least not for me. Read on to learn why.
I found Velocidrone to be quite difficult to use. This was the sim most people recommended and I wrote about in the previous article. Even after I managed to configure my Taranis with this simulator, I felt that it was too difficult to fly and it just didn’t feel right. To their defense, I’m still a bit lousy at flying obviously, but I felt there was no way of finding out if I had configured it right. The graphics were not fantastic either, so it worked very well on my smallest laptop, which was a plus.
Useful article: List of FPV tips and advice for beginners
Then I tried RotorRush. Not fancy graphics here either. It was easier to configure and the response from the transmitter to how the drone acted felt right. I had lots of fun with this simulator and even my kids managed to fly pretty well. I then started realizing that this sim probably was to easy to fly… I mastered it too quickly. It is fair to say that this program leans more towards being a fun game than a training simulator.
But for me the next drone simulator I tried was the best:
Finally, I bought Liftoff on Steam. It was surprisingly easy to configure and a visual feedback on a transmitter model in the program let me see that the joysticks was correctly configured and worked as expected. The graphics are awesome and even the blurriness and flickering of the FPV goggles are well presented. There are a lot of tutorials that are easy to follow and thought me how to maneuver the drones through increasingly difficult courses. I also finally learned the differences between Acro, Angle, and Horizon flight. Acro is the most difficult way of flying and does not self-level the drone, but it is in this mode most of the awesome drone footage taken by professional FPV pilots are shot.
Now, all I need to practice even more…
Which drone simulator is your favorite?
1. Complete the build
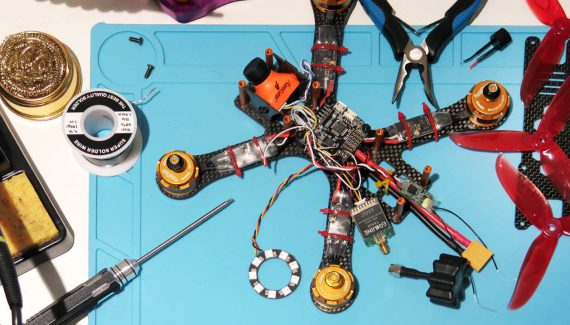
I have soldered and connected everything the drone need to operate. To see the name of parts I have used, check the list in the first post of the build project. It is updated with all the components I have discovered I needed to buy along the way.
The first assembly steps are:
- Nylon Standoffs in the four center holes.
- Place the PDB with Battery +/- facing backward.
- Solder on all the solder positions on FC, PDB and other components.
- Mount one ESC to each arm. Position them as you like, but I will place them on the arms. I didn’t need all the wiring from one of the sides (since the motors have their own wires) and soldered them off.
- Cut the motor wires. Put led free solder on the ends so they are ready for soldering. Do that with all wires that will be soldered.
- Solder wires from motors to ESCs. To be able to rotate the propellers the right way, wires can either be switched or change direction afterward in software. I did the latter as I describe further down.
- Mount motors to the bottom plate. Check the length of screws…. Long screws might damage the motors. Short screws don’t fasten the motors enough. Use a little bit blue medium Loctite on all metal screws when used in metal. Not for metal screws in plastic parts.
I have learned a lot from these awesome FPV drone channels on Youtube: Joshua Bardwell, Drone Mesh, Project Blue Falcon, Flite Test, Project Blue Falcon, and Lord Roika.
So… eventually, this is done:
- Each of four motors is connected to an ESC (Electronic Speed Controller) one on each arm
- The four ESCs soldered to the PDB (Power Distribution Board)
- An XT60 battery cable to the PDB
- The PDB is connected to the FC (Flight Controller) with power and signal cables
- The camera is mounted in the frame at an angle, gets power from the PDB and signals from the FC
- The Video transmitter is connected to PDB and FC
- The FrSky Xm+ receiver is connected to the FC (how to bind it is further down the article)
- A buzzer is soldered to the FC
- A led strip is also soldered to FC
- Connect audio cable directly from Camera to Vtx
Before final assembly, I did the final testing and configurations to make sure that everything works.

Before the top lid is mounted.
2. Download more software
I used the Betaflight Configuration software to configure and update the Flight Controller board and BLHeli program to update and configure the ESCs.
After some troubles using the Google Chrome extension of Betaflight and Cleanflight, I learned on a forum that these versions are outdated and should not be used. Cleanflight is old, and all the Chrome extensions are basically outdated as well. I had to download the standalone program instead. You should too…
- Here is the correct link for the working Betaflight Configurator.
- I downloaded the BLHeli Suite here.
Remember to download the latest CP210x Drivers and/or STM USB VCP drivers showed on the first page of the Beta flight Configurator screen. You don’t necessarily need to download both drivers, just the one that fits your Flight Controller, but there is no harm in getting both.
There are many YouTube videos on how to setup Beaflight if you do the search.

Betaflight Configurator startup screen.
3. Update the Flight Controller
Next step is to update the FC board to the latest firmware. I had a lot of troubles with this…
It took a while for me to understand I had to set the FC in bootloader mode. On some flight controllers, there are two points that need to be either soldered (not necessary) or connected before inserting the USB cable. The status indicator on the FC that is normally red will turn off if the board is set in the correct bootloader mode.
When I finally understood that I had to press a bootloader button, the firmware update went pretty smoothly. If you read my first post you saw that I bought an Omnibus Betaflight F3 flight controller. (You should probably buy a F4)
So, in the Firmware Flasher settings, I chose OMNIBUS and chose the latest stable build. All the other settings were turned off. Obviously, it is smart to try with all settings off first. If you still can’t update the firmware, you could turn on ‘No reboot sequence’ and ‘Full chip erase’.
The video below turned out to be very useful! Watch it if you have problems flashing the firmware.
4. Configure settings in Betaflight
I did several settings I did set up in the configuration software. I changed the ESC protocol to ONESHOT125, since it matches my components and set the Receiver to SBUS. The port UART3 is set to Serial RX with telemetry output FrSky.
While testing I experienced that the VTx and antenna got burning hot. I google it and learned that this can destroy the VTx pretty fast. Obviously, rule number one when bench-testing the drone is to never have the antenna connected, and if you need to have a fan or something blowing on it. Boy, there are lots of things to learn the hard way…
Remember that you don’t need the battery connected to the drone when you are connected to the PC, but certain features like running motors etc need battery power. It is smart to check the rotation of the motors early on and discover which of the motors that need to reverse. I have written about this procedure further down at bullet 7.
5. Bind FrSky Xm+ RTx to Taranis transmitter
Now I wanted to bind my Taranis QX7 transmitter remote controller to the FrSky Xm+ receiver on the drone. I have already made sure in the Beta flight settings that the port UART3 is set to Serial RX with telemetry output FrSky.
- On the Taranis, go to the Setup menu and scroll to the bottom of the page. For this build, I make sure the Mode is set to D16. Chose a receiver number you don’t have used yet and press Bind. The radio will make beeping sounds to let you know that it is in binding mode.
- The FrSky receiver needs USB power to make a bind which it gets from the FC, but don’t plug in the cable yet! Hold in the small golden button on the FrSky receiver with your finger or nail and THEN insert the USB cable to the FC.
- When you see a solid green light with a blinking red light, release your finger. Remove the USB cable and power.
- Go to the menu on the Taranis and stop the binding (and the beeping).
- When you apply power to the receiver again, you should see a green light that indicates that the binding between the receiver and transmitter is ok.
Check with Betaflight in the Reciever tab that you get movement when using the joysticks.

The green light on the receiver means binding is ok. The button is on the right side.
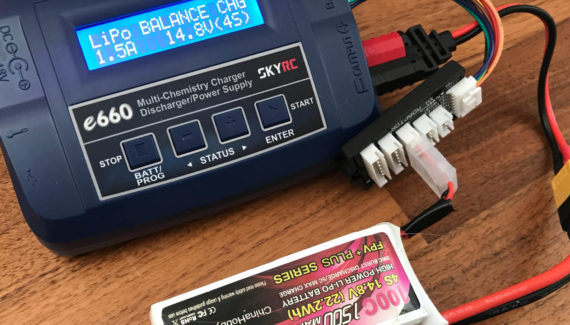
6. Calibrate ESC’s and motor speed
Your motors will probably start at different speeds and act unnaturally if you don’t calibrate the ESCs. This can be done in Betaflight, but the procedure needs to be correct and not very easy to understand at first. Here is the way to do it:
- Start Betaflight Configurator and connect the drone with USB cable – No battery!
- In the Motors tab, slide the Master slide to maximum (2000 in my case). Since the battery is not connected the motors will not move at this stage.
- Plug in the LiPo battery and listen to a symphony of sounds.
- When silent, slide the Master slide to the bottom and listen to more sounds.
- When silent, the ESC’s are calibrated and start at the same time when you test the Master slider on individual motors.

Calibrating the motors in software.
7. Reversing two of the motors
This was also something I struggled with a while – how to turn two of the motors that were spinning the wrong way and tune them.
The motors on the drone are spinning the same way when mounted as default. The motors I bought came in pairs, one pair with black hubs and one with colors. They have arrows that show which way the motors are supposed to turn and that and However, two of the motors diagonally, have to spin in opposite direction. On my setup, it was motor 1 and 4 that I had to reverse.
By the way, it is not the motor itself that control its rotation, but the ESC between the Flight Controller and motor.

The correct rotation of the motors when the camera is in the front direction.
This can be done either by switching two of the cables connecting the motor to the ESC. I had very short cables and didn’t try this, and I also wanted to learn how to do this with software.
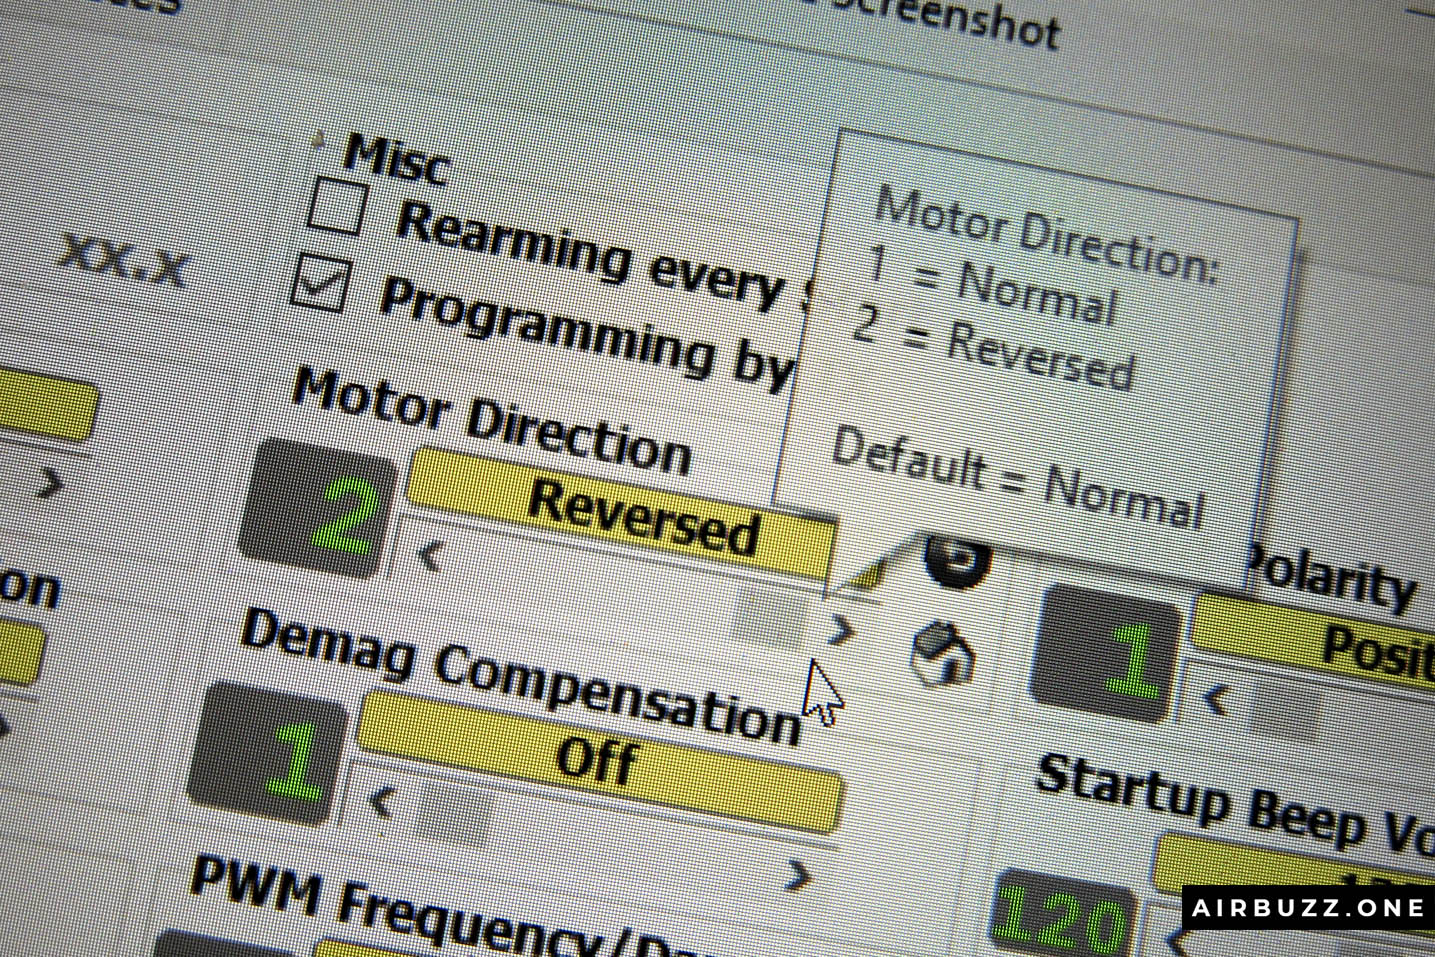
This is where the BLHeli Suite here software come in handy. When you have a connection with the drone by USB, select the two ESCs that rotate in the wrong direction, in my case 1 and 4, and change to Reversed. Save and check that the rotation is correct by running the motors in Betaflight.
9. Set switches on the Taranis QX7 radio
The transmitter and the receiver are bound together (bullet 5), but you still need to program which of the knobs and buttons on the radio that do certain things.
The switches for Arm, Buzzer and so forth are set on the Taranis Q X7 itself and configured in Betaflight afterwards. I learned this from this awesome Youtube video, so I will not go into details here. It is a little bit difficult to explain so watch the video and skip my text if that is more useful.
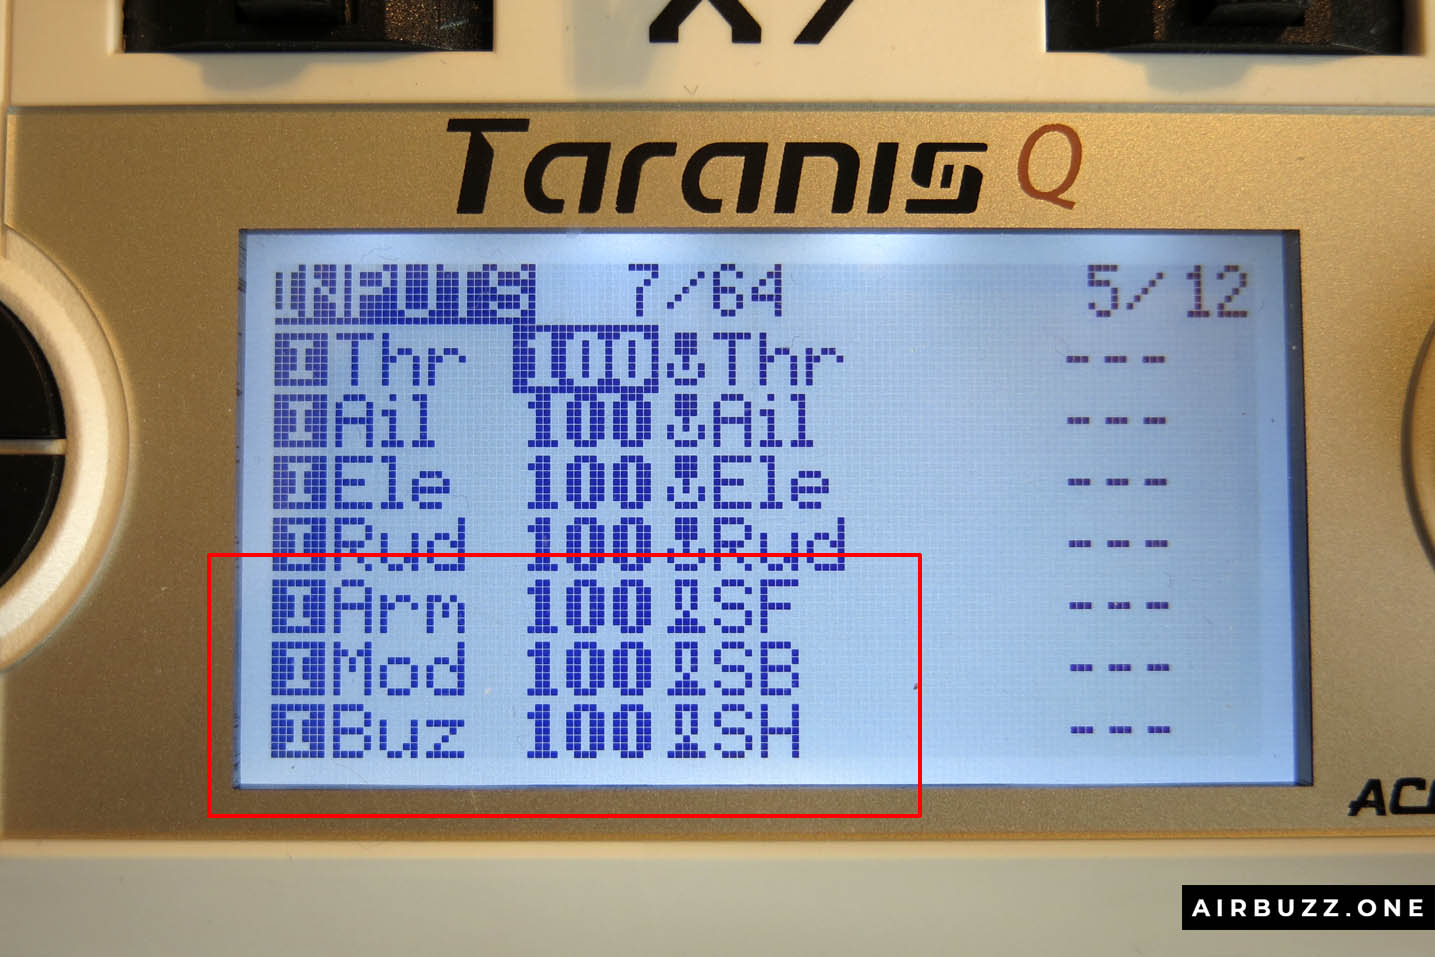
When you are on the Taranis enter your model settings, press the Page button a few times and go to Inputs. The four inputs on top, Throttle (Thr), Aileron (Ail), Elevation (Ele), and Rudder (Rud) are already set up. I want to add Arming function to one of the knobs for arming the drone and create a safe way to shut it down fast if I need to. I also added a Mode function to a three-way knob and a way to turn on/off the buzzer on the drone. I will add a Blackbox function later.
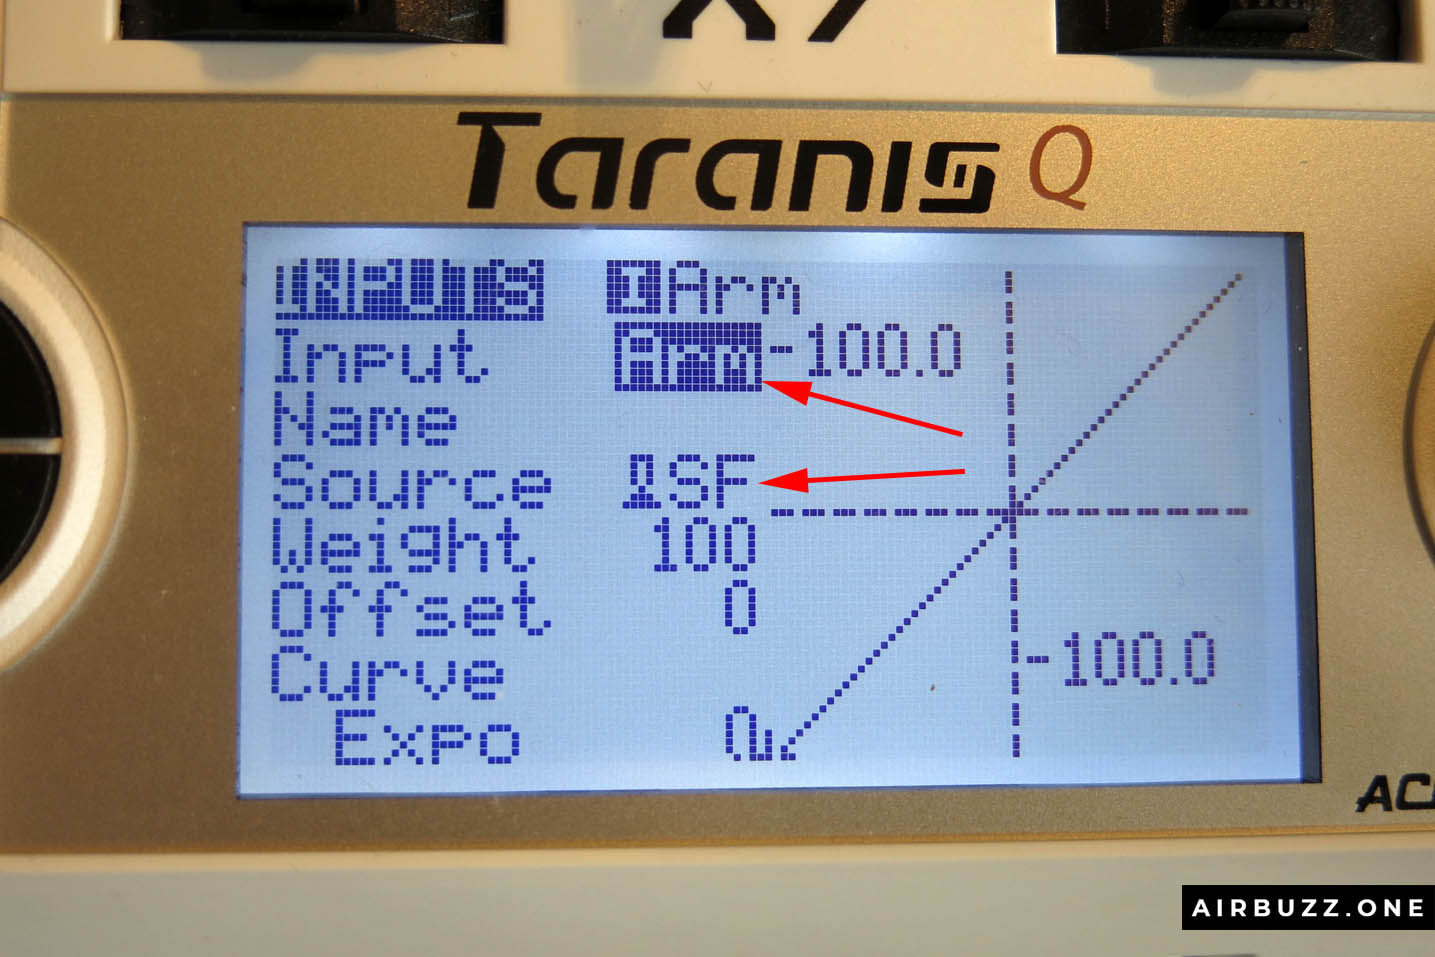
In the menu and when you are inside a chosen Input feature, chose a three letter name. Hold the big circular button down for Caps. Then you chose which one of the knobs that will have this function in Source. Simply click and select Source and interact with the desired knob on the radio itself – much easier than remembering the name of all knobs.
By the way… To put it simply, the Modes knob will turn off and on certain leveling features that help you fly. Without all these sensors you fly in so call Acro mode which is more difficult, but let you do tricks and cooler videos. The Mode knob values will be set to up=Acro mode, center=Horizion, and down=Angle.
The beeper is only a nice feature if I lose the drone in the forest and need it to make a loud sound.
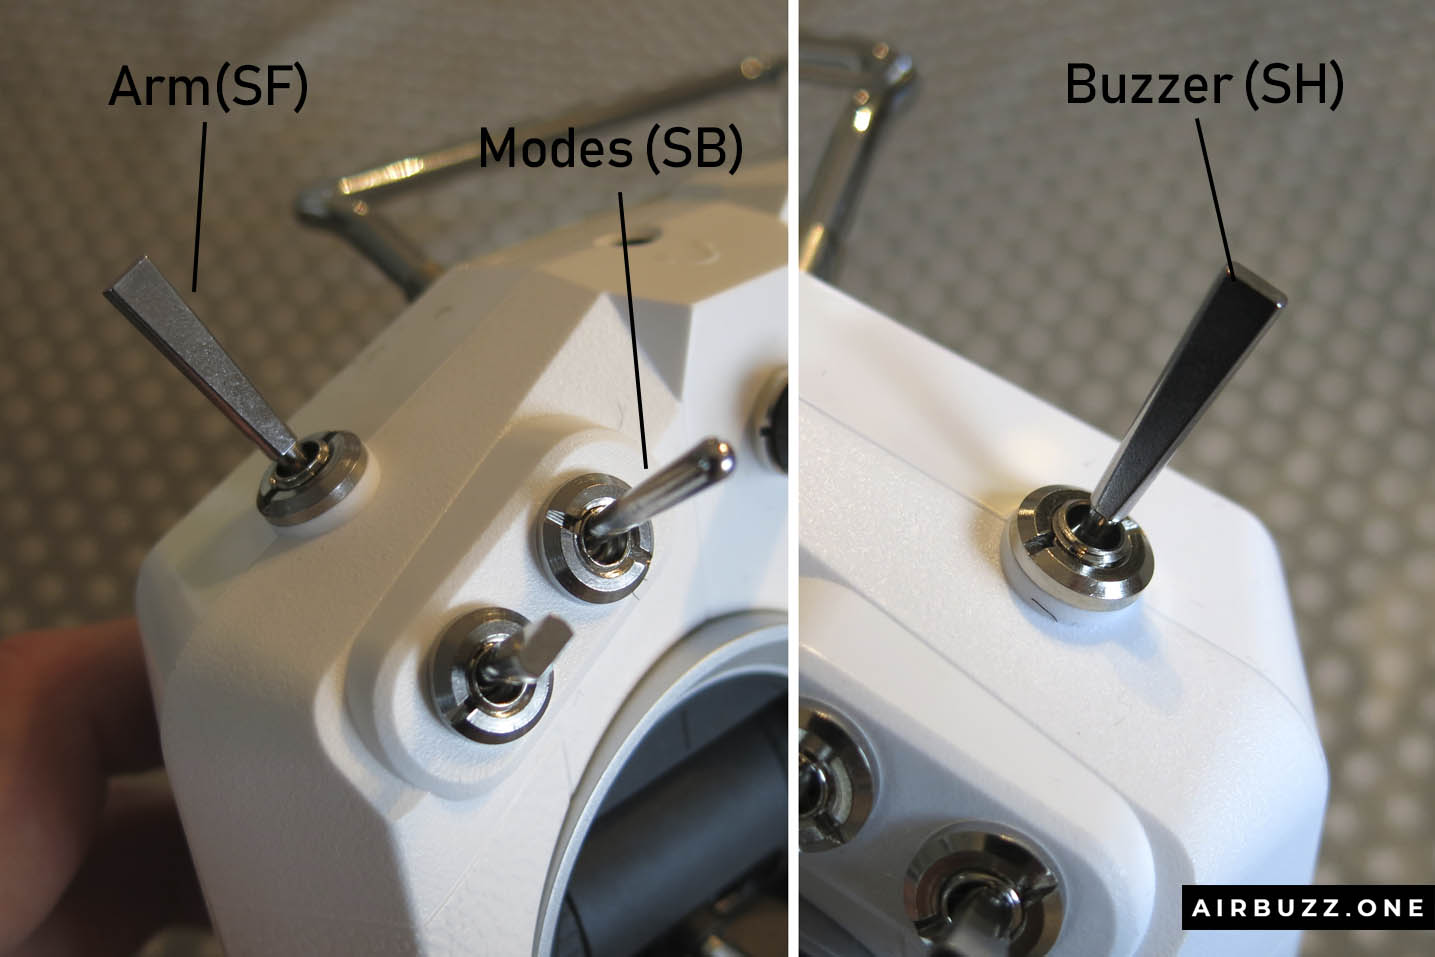
Still in the menus go to Mixer. Change the names to the following: Arm = A1, Mod = A2 and Buz = A3. The A numbers correspond to Aux 1, 2 and 3 which you will see in a second in the configuration software.
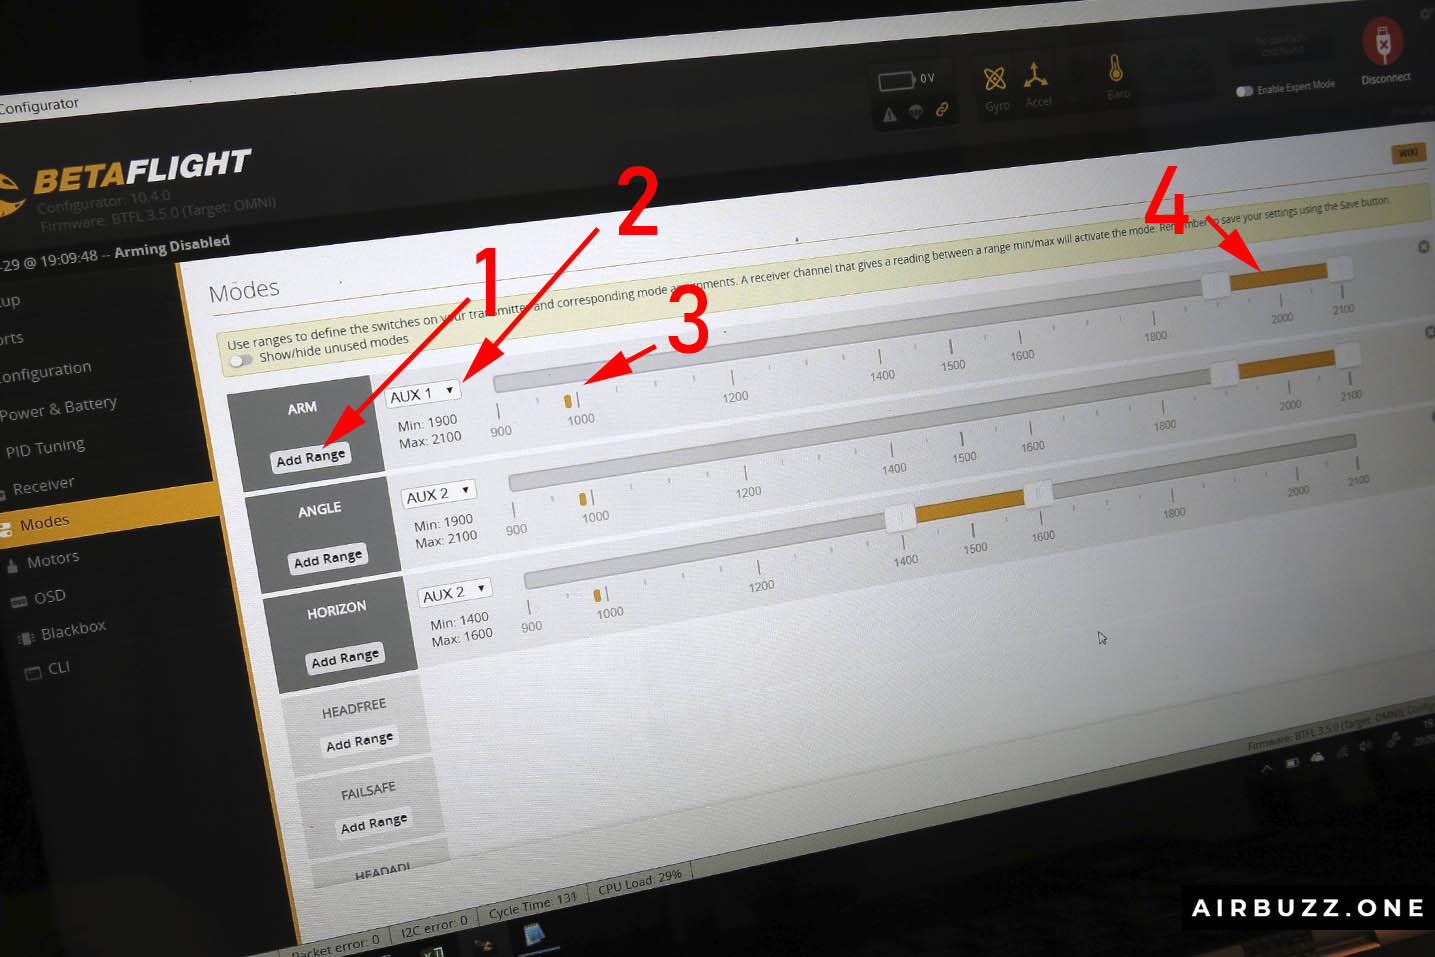
Then you need to set the values in Betaflight under the Modes menu.
- Click Add Range to ARM.
- Chose AUX 1 since I called it A1 on the radio settings.
- This small yellow dot shows the position and value of the knob. When the knob is activated, the yellow dot moves higher up. (To number 4 in the picture)
- Change the range to this position. This means that the knob and Arm are off in default butt activated when the knob is flipped.
The ANGLE and HORIZON are activated using the AUX 2 channel (since I called them A2) and a three-way knob. So when the switch is in the upper position, HORIZON and ANGLE are off, as seen on the picture. This is what is Acro mode. When the knob is flipped to center HORIZON is activated, and to the down position, ANGLE is activated.
Was it difficult to understand?
The Buzzer also have a range added to it with Off in the default position and a yellow range on its On position.
9. Configure LED light
I can’t get this to work yet. Betaflight simply doesn’t want to save the LED_STRIP setting when I save the setting. Any ideas?
10. Test camera and VTx
I bought a pair of used Fat Shark Dominator V2 FPV goggles with the receiver. I simply didn’t want a lot of money on a new pair if I wasn’t able to connect everything and get the drone to work. I needed them fast so I could verify that the Camera and VTx worked. And they did! I just turned on the goggles and I could see through the camera.
I didn’t know this could be so easy… So, unfortunately, I didn’t learn anything from setting this up.
11.Calibrate accelerometer and final assembly
To make sure that the accelerometer and FC level sensors are calibrated you should do a calibration in Betaflight. It is important if you want to fly in Angle mode. Fire up the software with the drone connected by USB, select Calibrate Accelerometer from the first Setup page. Very easy.
Final assembly was:
- Fasten the VTx to the roof part. Mounted the antenna with shrink plastic on the connection.
- Fasten the FrSky receiver and use strips with heat tubes to mount the antennas.
- Route the power cable from the FC so that battery easily can be connected to it.
- Place anti-slip rubber on top of the roof, place the battery and strap it tight.
- Place four landing pads underneath.
- (Place action camera in a frame on top of the roof.)
Post your questions in the commenting section below! Next article in this series will be about my first test flight!
Take care.

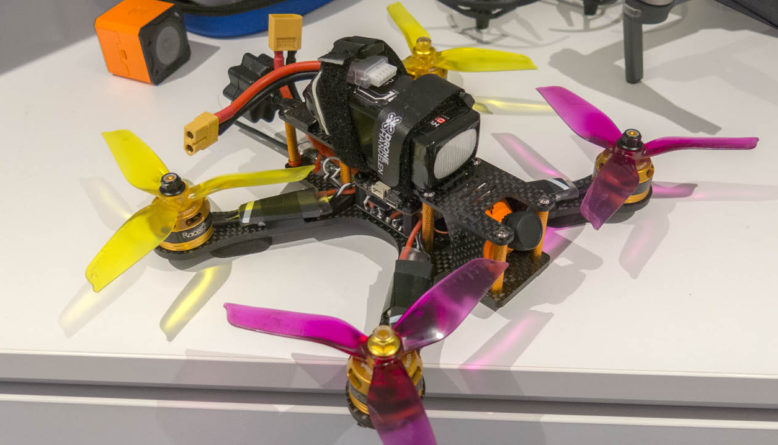
Finished drone. I still wait for the drone action camera mount.
In LiPo trouble? Read: How to fix Cell Error message when charging a LiPo
12. Video from test flights
Here are a couple of videos from test flights in a field:
And an accident video when I hit a tree with the FPV and my son has to climb up and rescue it… Big fail. 🙂
A surprisingly high cliff, a tall Waterfall, and a historic Powerplant!
2 Comments
Wow I did not know that you can built it yourself. I can see you have the technical knowledge to do it. So is it better to build one ourselves or buy one from the store? There is so many parts and component to buy and testing to see if this work out.
If you want to learn how the drone works it is definetly best to build it yourself. But it is a bit timeconsuming and needs lots of research like watching youtube videos and ask silly questions on forums. I have had moments where I just wanted to throw the whole thing and buy a finished FPV drone instead. 😉 Andreas