Is the Ryze Tello drone powered by DJI worth the money, and is it perhaps the first decent beginner drone? Let’s find out in my review.
So, I have bought myself a new drone. This time it is not an expensive camera-copter but a small indoor toy drone called Ryze Tello. The Tello does not have its own remote controller but is controlled by a smartphone and app. I have also bought the Gamevice controller for iPhone that works with the drone and will review this one too.
Right now DJI released a pimped up version of the Tello called Iron Man Editon, so be sure to check that one out too.
I have bought myself a fair share of small and cheap indoor drones from Alibaba and eBay during the last years. All of them are notoriously difficult to fly, and often crash. Most of them handle the crashes well, but it makes it too challenging to have fun in my opinion. Here is a review of one of the more successful micro drones I have bought, the Eachine E012.

Beginner versus Professional drones
I think it is a controversy that small and cheap drones are called beginner drones. Many of them are very difficult to fly, even indoors, and they crash a lot. What you learn from these are that flying is difficult and you might even give up and throw the toy copter in the garbage. You have wasted a few bucks, but you are not coming closer to being a good drone pilot.
I think that if you aim to have fun with your drone it should at least cost around $100 or higher. This drone is right in that price segment, lucky you.
Check out: 45 Awesome Drone Photos of Abandoned Places
When I bought my first ‘professional’ camera-drone, the DJI Mavic Pro, I was surprised at how easy it was to fly. When I stopped moving the sticks the Mavic hang in the air perfectly still waiting for the next input. It has, of course, much more sensors and data power to calculate all this, but it came to my mind that perhaps this drone fits beginners more than the toys and that the small cheap drones are for professionals. Just a thought.
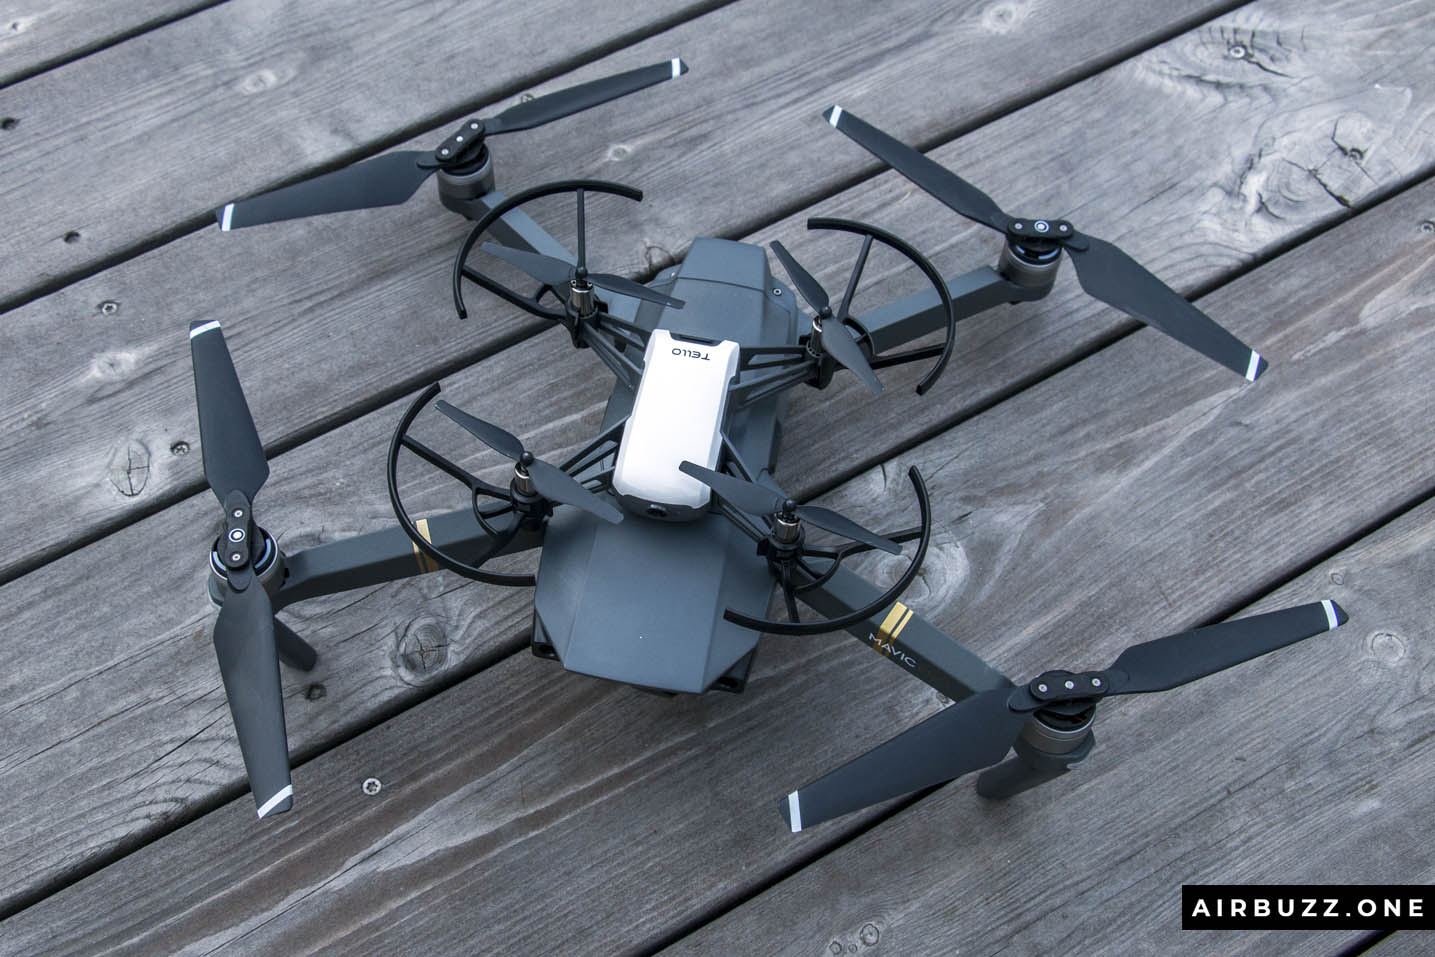
DJI Mavic Pro looks huge compared to this small drone.
So, where on the range of beginner and professional drone do we find the consumer-friendly Tello? Let’s find out. But first we need to talk about some confusion:
DJI Tello, or Ryze Tello?
Ryze Tello is as mentioned a small, smart and affordable low-end FPV (First Person View) drone that is on the borderline of a toy. The base price is $99, which is of course much cheaper than the larger and more expensive drones.
It is made by a startup company called Ryze Tech who have partnered up with DJI and Intel for the flight control system and processing. So even if many people call it the DJI Tello drone, DJI has really only delivered some components on the inside. But you can still buy it in the official DJI store.
These are a few of the main features that you can read about on the outside of the box:
- 13 min flight time
- 720p HD transmission
- 5 MP photos
- Electronic Image Stabilization
- Precision hovering
- Multiple flight modes
- Easy to operate
- Programmable with Tello SDK.
A few compatible accessories are also shown on the back of the box: It is a remote controller (but there are not as many available as it seems), battery charging hub, and colored snap on top covers. A QR code can be used for easy or app installation.
Now, what is inside the box:
Unboxing
The Tello comes in a rather small box since it is a small drone, and there is no remote controller. The front is see-through plastic so you can easily see the nice new product neatly placed on the inside with propellers and guards mounted on.
The battery, four extra propellers, a propeller removal tool, and an instruction leaflet lies in a compartment at the bottom of the box.
So, to summarize, when you unbox the Tello drone, this is what you find:
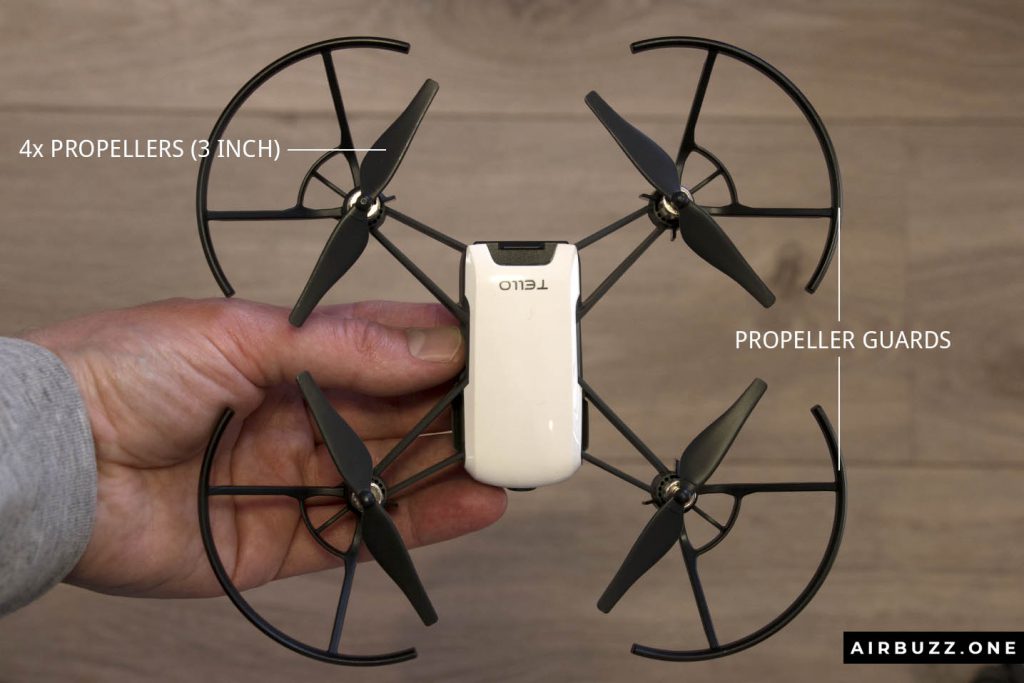
- 1x Aircraft with white cover
- 4x Propellers (2 pairs)
- 4x Propeller Guards (mounted on drone)
- 1x Battery
- 1x Propeller Removal Tool
- Manual
No Micro USB cable comes with the package.

Gamevice remote controller
If you have read on forums about compatible Bluetooth controllers for Tello, there are a lot of questions and a few answers. I think the controversy started when the manufacturer claimed that customers could use almost any Bluetooth gaming controller to steer the drone. This was not true of course… In the end, it seems there were only two controllers work straight out of the box, the Gamevice, and the GameSir T1d.
I have not tried the GameSir, so if you have and can confirm that it works, please write a comment below.
The Gamevice comes in three different versions that fit iPhones and iPads. The one I bought fits iPhone 6, 6s and 7 and the Plus versions. The controller has a lightning contact you plug the phone into. The connection between the two controller pars are flexible but can be tightened up with a locking mechanism on the backside.
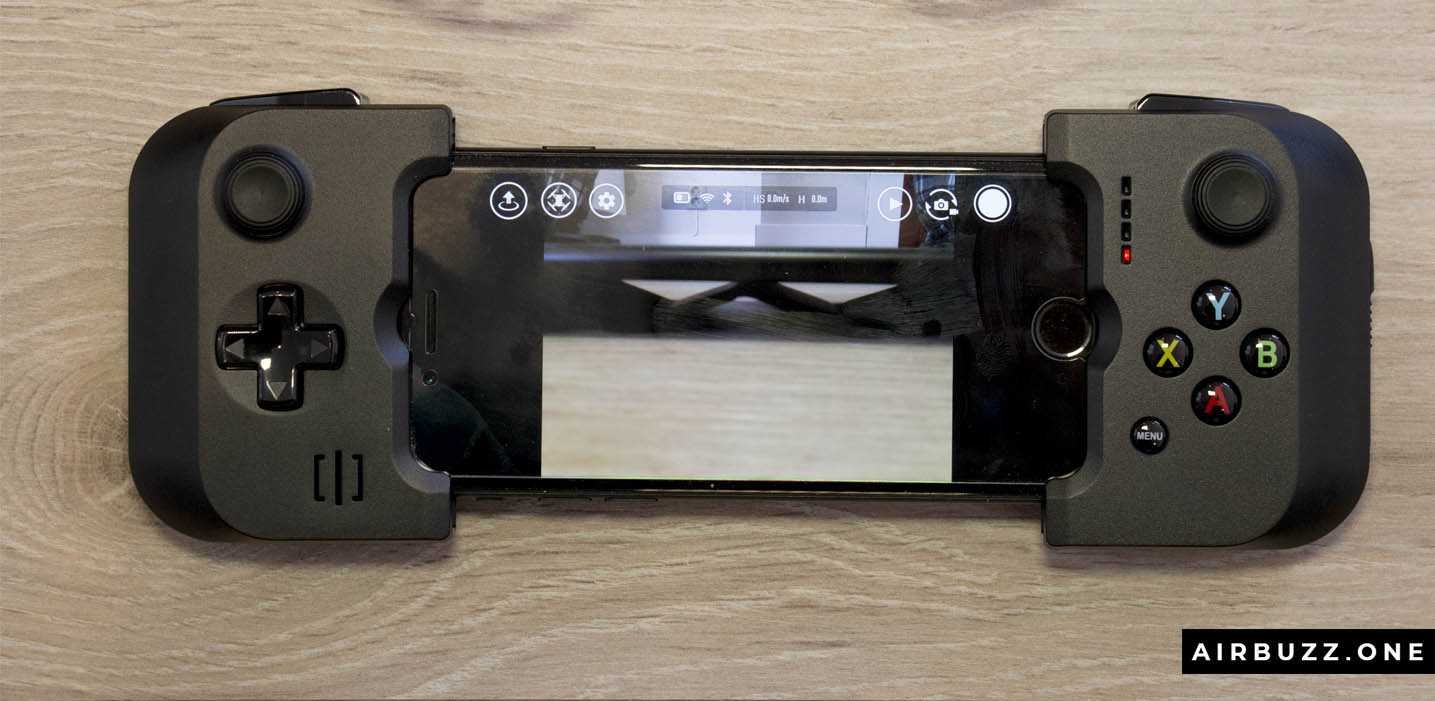
Gamevice for iPhone 6, 6s and 7 and the Plus versions.
Related article from DJI: What Makes Tello the Most Fun Drone Ever
Unboxing
When unboxing the Gamevice, you find:
- 1x the Gamevice controller for iPhone and iPhone Plus
- Manual
- Sticker
- Postcard
To skip to the conclusion: The Gamevice works great with Tello. The process is plug and play and I didn’t experience any difficulties at all. You can install an app that gives you ideas of other games you can download for your phone that supports this controller, but you don’t have to.
The Tello app automatically hides the onscreen joysticks but the rest looks the same.
![]()
![]()
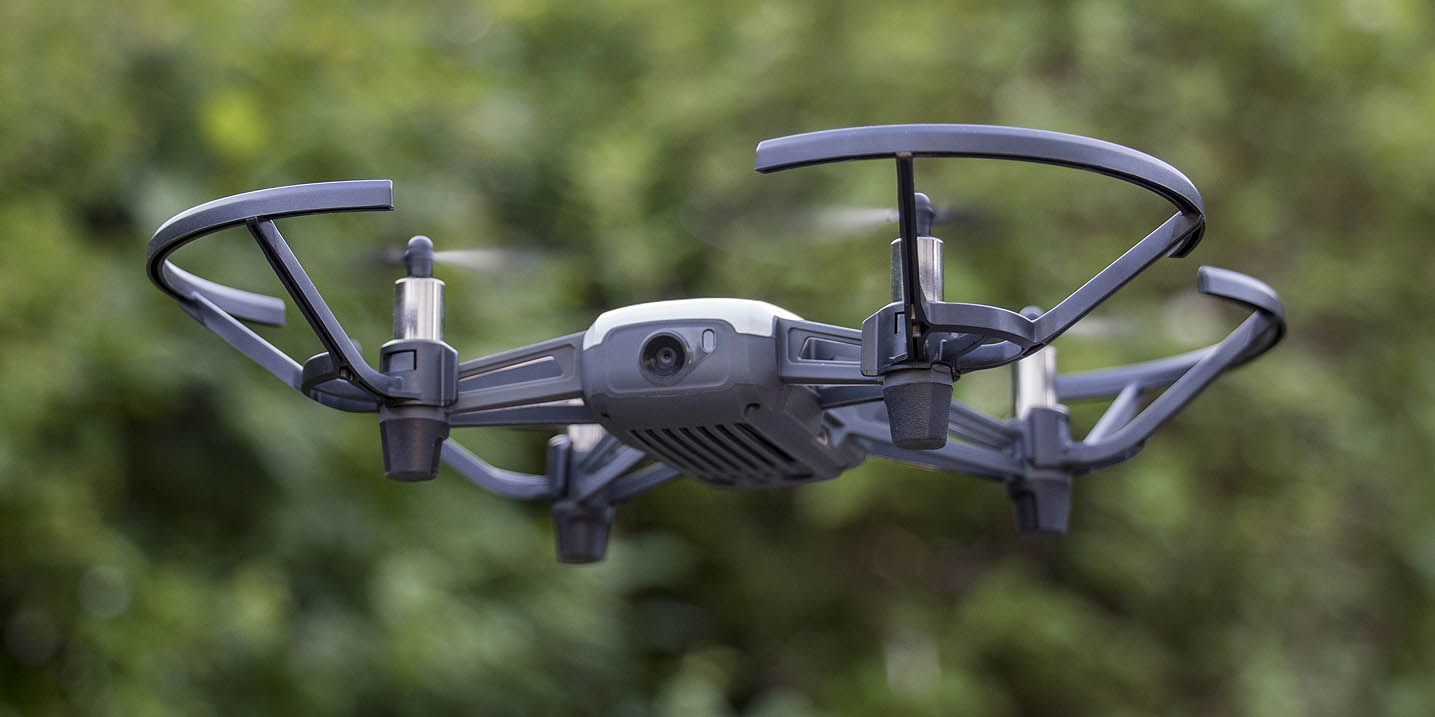
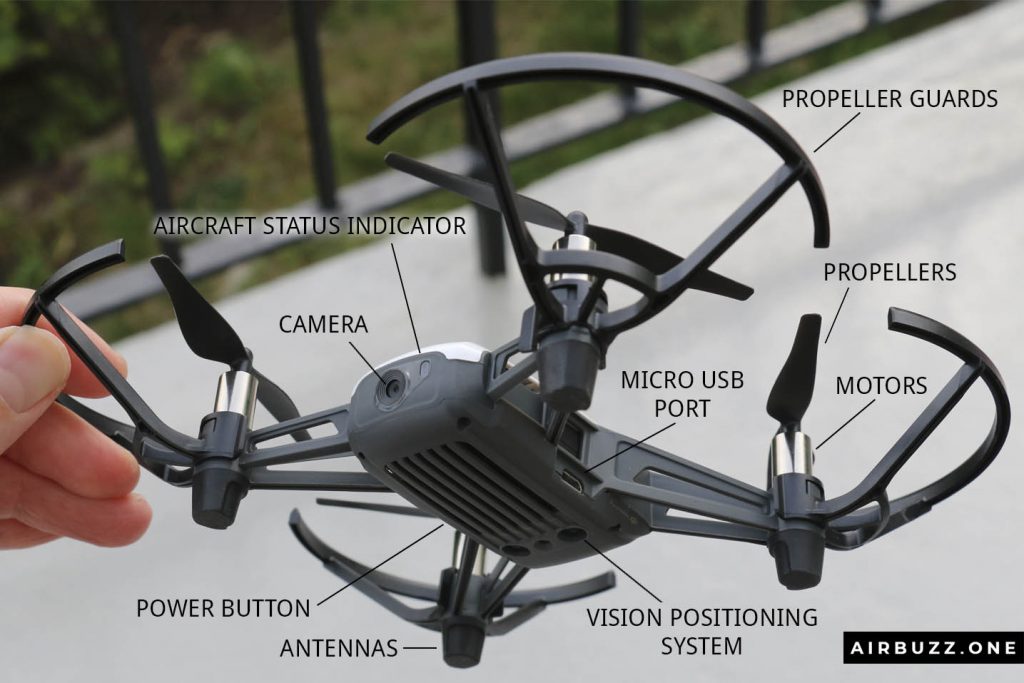
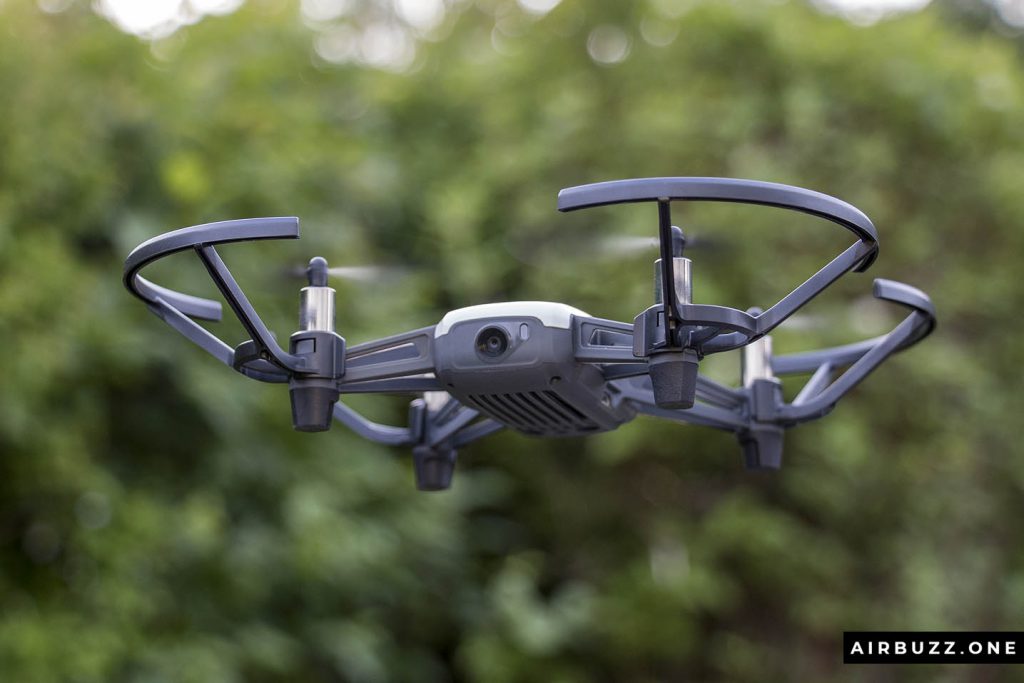
A little bit of build quality and design
The build quality is great and it feels like a professional drone even if it is a cheap one. Most of the drone is made of high-quality plastic that makes it lightweight. It weighs 88 g on my kitchen scale with battery and propellers with guards attached. It looks a bit like a tiny DJI Spark.
It comes with a white snap-on cover on top, but if you want to change the appearance you can buy colorful top covers and change out. I have the blue one myself.
The four unfoldable plastic arms are hollow with a small power cord to the motor. The propellers are protected by a propeller guard which I recommend that you leave on. I think they should have been a little bit taller to go over the top of the propeller. Just an observation after I flew it up and hit the ceiling. On the underside of each arm, under the brushed motors, are the antennas with soft rubberlike landing feet.
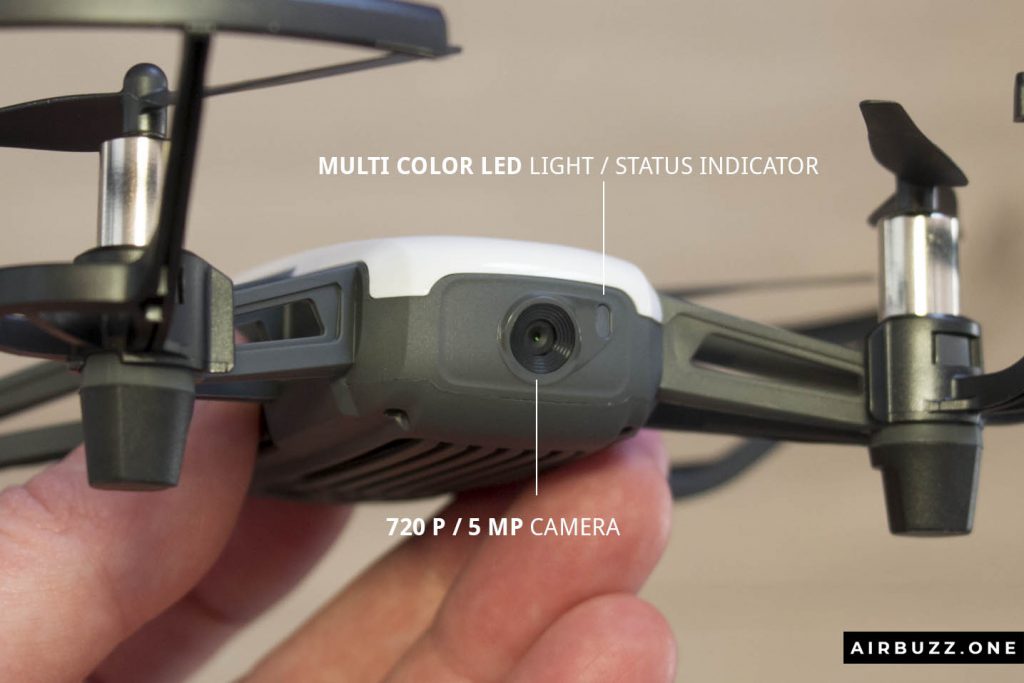
On the front is a small forward pointing camera that can shoot 720p videos and take pictures in 2592×1936 resolution in two different qualities. The camera has Electronic Image Stabilization (EIS) to prevent blurry pics.
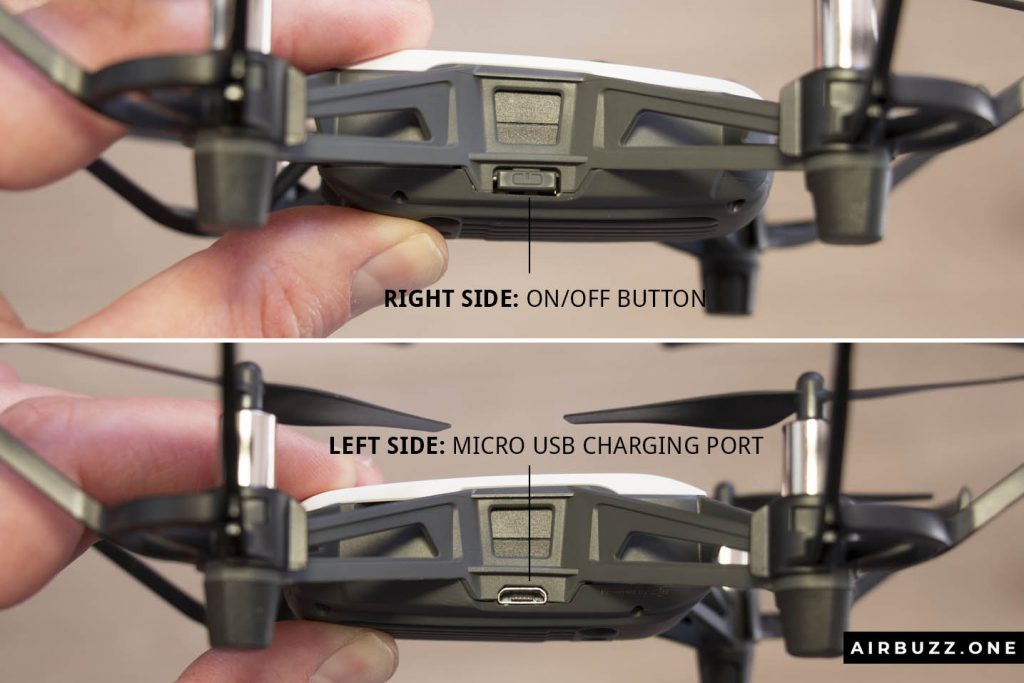
On the left side is a USB charging port and on the right side is a power button. The battery compartment is on the back side.
Underneath is the Vision Positioning System that helps the drone maintain its current position and be stable. The key components in the system is a camera and a 3D infrared module. Pretty neat for a product in this price range!
Under the hood of this smart toy drone is a 14-core Intel processor. It supposedly has a collision detection system too, which is difficult to find but I think it has to do with the motors shutting down if the propellers are obstructed or hit something.
Difference between Normal and High photo quality
There is a setting in the Tello app where you can choose between Normal or High image quality. The default is Normal, and even I have changed the setting to High, I don’t see any big difference. The file size is slightly bigger, but that’s it.
Here is an example of a picture with the full resolution (2592 x 1936) taken with Ryze Tello – click on the thumbnail picture below:
Click for an uncompressed image straight from the drone.
The first steps before take-off
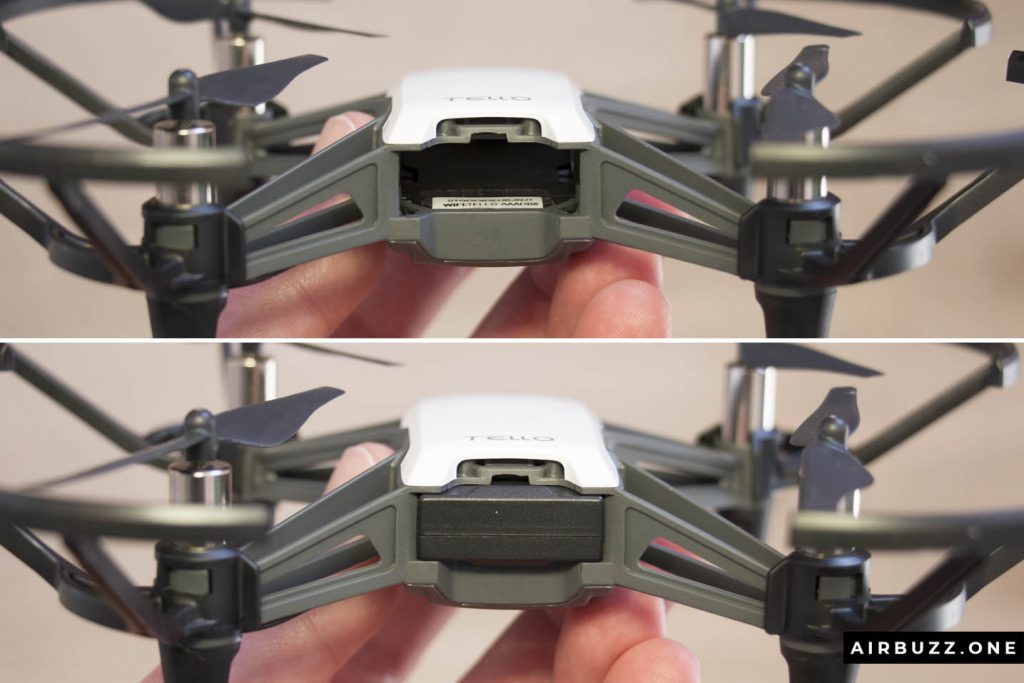
The first thing I had to do before the first flight was to install the battery in the drone. I made sure that the text on the battery was down. I checked that the contact pins on the battery and the inside the drone body matched.
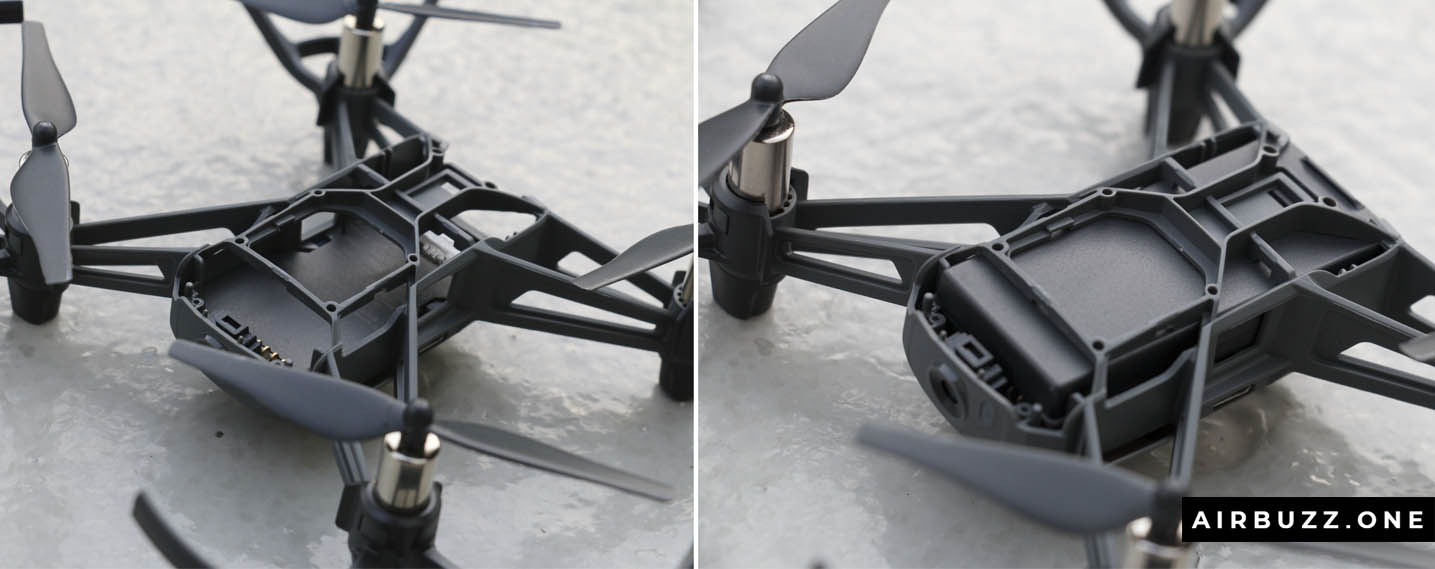
Skeleton with and without battery. Cover removed.
Then I had to look for a micro USB charger cord since that didn’t come with the product for some reason. Ryze Tech probably made that choice to keep the price down.
When charging there is a blue light blinking on the front next to the camera. It takes about 1,5 hours. When the blue light stops blinking, the charging is finished.
Then I was ready to go. Here is a good tip for you:
Perform a test flight the first time you fly the drone, and once in a while to check that everything works as it should:
- Place the aircraft on a flat surface with the camera pointing away from you.
- Press the On button on the aircraft
- Start the Tello app, connect to the phone with Wifi if necessary, and check that the camera works
- Use the auto takeoff function
- Use the virtual joysticks (or Bluetooth controller) to move the drone a little bit
- Use auto landing and land safely
- Turn off the craft.
Easy, isn’t it? But wait… you will also need an app on your smartphone:
Tello app
The free of charge app needed to run the drone is called Tello. It is a simple app that is easy to understand, but it still holds a few awesome features. It is a QR code on the back of the box for easy installation, or search on Google Play or App Store.
When you start the app you will probably come to a How to Connect screen. Maybe you need to update the firmware first, too. If the language is in Chinese, I have a quick fix for that further down in the article. After connection with the drone through its own Wifi, you are good to go.
If you have no other compatible controllers you will control the drone via the smartphone screen with your fingers. On the bottom left and right are big circles that mimic the joystick controllers. The left circle is used to move the craft up and down and rotate around its upwards axle. It’s the usual configuration you might be familiar with on other drones like Mavic Pro and Spark. The right circle controls the forward, back and sideways movements. You can change the layout of the virtual joysticks in the settings menu.
If you use a compatible gaming controller like Gamevice or GameSir T1d the onscreen joysticks are hidden.
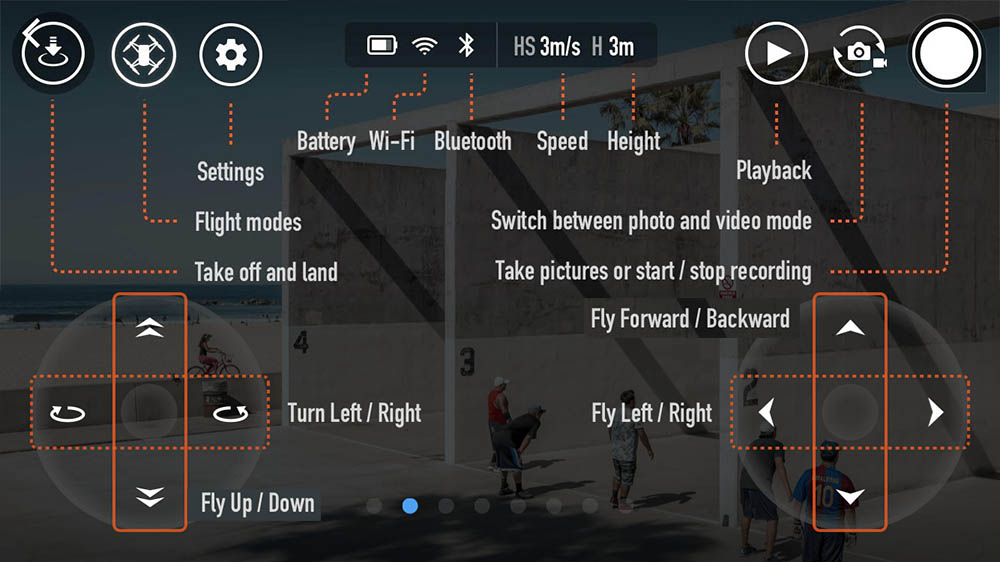
The app menu with an explanation.
On the top bar are several other options. The icon far to the left is the automatic takeoff option. When pressed you are presented with a slider you can use to let the Tello fly up from the ground all by itself. It also doubles as an auto landing system when you want the drone back on the ground (Tap to Land) or in your hand (Hand Landing).
The second icon is the different Flight Modes. These are different intelligent programs the mini-drone can perform. These are:
- 8D Flips which let you flip in 8 different directions.
- Up & Away which records a short video while flying upward and backward
- Throw & Go which let you toss the aircraft in the air and it will hower in place
- 360 mode which records a short video while spinning 360 degrees around itself
- Circle mode which records a short video while flying in a circle
- Bounce Mode that let it fly up and down between 0.5m and 1.2 meters on a flat surface. Mimics the motion of a bouncing ball.
So it is quite incredible what this cheap mini-drone can do!
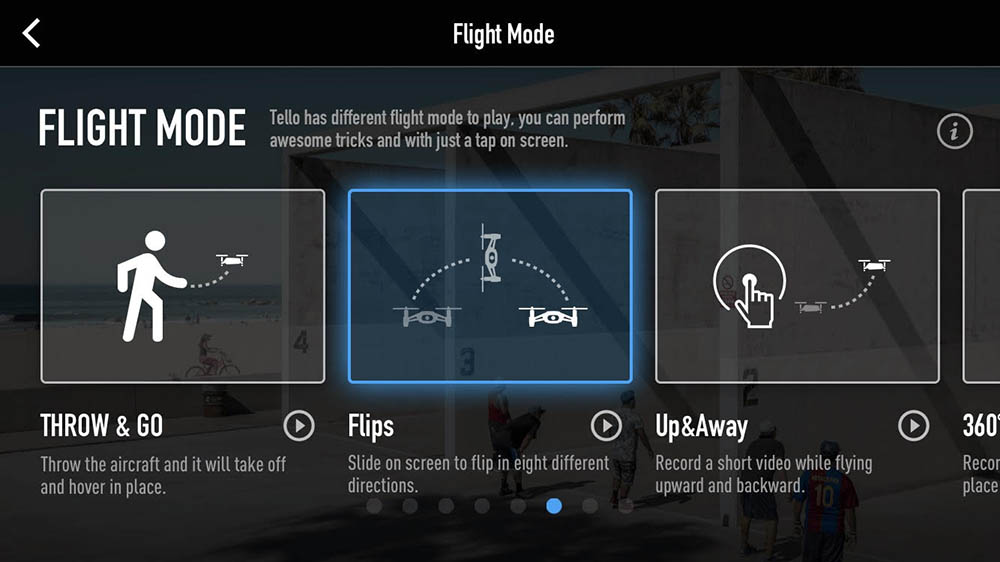
Flight Mode menu
The third icon is the Settings menu. You can change the flight speed to Slow or Fast, change to VR mode (split the view in two), set up a Bluetooth controller, see some Wi-Fi settings and more. The advanced settings include changing between metric and imperial measurement system, set the Photo Quality to either Normal or High (the default is normal, so it is a good idea to change it to High), set the Low Battery Warning (default is 10%, but can be set to 50%), change Bitrate and a few other things.
Firmware updates, app version information and Center of gravity calibration can also be found here if you press the icon with the three dots. I find the number of settings to be just what you need, nothing more, nothing less.
You will not feel that it is an overwhelming level of options and numbers you have to adjust. Most of the time you don’t need to fiddle around in here at all.
The smaller icons on the middle top screen show the battery percentage if you have a Wi-fi connection, Bluetooth connection, and the Speed and Height when flying.
Then, to the far right, you have Playback of your recorded pictures and videos, a button for switching between Camera and Video mode and the Record button itself. The record/shutter button starts recording either video or taking a picture depending on which camera mode you have set.
Fairly easy to understand, right?
Check out: 31 Best DJI Mavic Pro Accessories and Gadgets! (2018)
How to change the Chinese language in the Tello app
I had big troubles in the beginning with the iOS app. The language was in Chinese which seems to be a problem with iPhones that use another language than English. I managed to solve the problem after contacting the store and RyzeTech.
To be able to change the Tello App’s language on your phone, please do the following;
- On your phone, open Settings.
- On the next screen, tap General.
- Select Language & Region.
- Tap Device language. On the next screen, tap “[English] Language”.
- Confirm your selection. An alert will ask you to confirm the new language. Tap the first option that says “Change to [English]”.
- After your device updates the language, it should return to the Home screen.
- When you have confirmed that the app’s language is English, you can return the phone’s language back to Norwegian (my choice), or whatever language you prefer.
- The Tello app is not Chinese anymore.
Works with DroneBlocks
If you want to have more fun with the Tello and program different flight missions, try the DroneBlocks application. It, unfortunately, only works for iOS and not for Android. With it, you can program automatic flight paths and with the Scratch code language. Of course, you don’t need to code anything, but drag in preprogrammed building blocks of code and put them in the correct sequence. Very fun and easy to learn.
The app is highly friendly and even a child can understand it quickly (maybe quicker than you.. haha). It takes your drone play up to the next level when you are getting tired of just flying around normally.
This app also works with most other DJI drones, like Phantom, Mavic and Inspire 1.
More accessories
There are several extra gadgets and gizmos you can buy for this small aircraft, and many more are showing up in online stores every day.
You can buy extra propellers, batteries, covers, charging solutions, range extenders and more. Under is a link to one of my articles covering 15 of the best accessories and gadgets.
Which Bluetooth controller works?
This has been a controversial theme in forums and discussion groups. There are two confirmed working controllers at the moment, even if it has been claimed that most Bluetooth gaming controller that can be connected to a mobile phone works.
The working controllers are the one I have, the Gamevice and the GameSir T1D.
Battery type, charging and life
The 3.8V intelligent flight batteries have a capacity of 1100mAh. They weigh around 26 g and operates best in the range of 5 to 45 degrees Celsius.
A fully charged battery gives you 13 minutes of flight time. After that, the battery is easily replaced with a new one of you have more, or the drone is charged with a USB cable. A full charge is usually done within 1 – 1.5 hours.
Can it handle a crash well?
I must admit I have crashed the Tello quite a lot. Both indoors and outdoors. While flying indoors I have sometimes experienced lagging on the video transmission so if I only trust what I see on the smartphone app, the small pauses can cause a bit of confusion and the drone hits the wall.
But, in essence, the robust quadrocopter can take a crash well and so far I don’t see any physical damages on it and I haven’t needed to change out propellers or other parts. Let me know in the commenting section if you have crashed it and if your little fellow survived.
Can Tello be used outdoors?
I have had no problems using it outdoors, but I stick to flying around in the garden and yard. I have experienced difficulties with a wind that blew my drone in a bush. The propellers simply were unable to fly forward in the wind and did not have a change. So check your surroundings during windy days and be sure not to fly high, or you might lose the drone.
Pros and Cons
| Positive + | Negative – |
|
|
Technical Specification
Key technical specifications and data on the drone:
| General design: |  |
| Size / Dimensions | 98 x 92.5 x 41 mm |
| Weight | 88 g with battery and propellers, 61 g without battery |
| Materials | Mainly plastic |
| Controller | Tello app - smartphone screen with virtual joysticks or some Bluetooth remote controllers |
| Propellers | 4x small blades - 76 mm long (3 inches), 10 mm on the widest |
| Sensors and hardware | Range Finder, Barometer, LED, Vision System, 2.4 GHz 802.11n Wi-Fi, 720p Live View |
| Motors | Brushed motors |
| Port(s) | Micro USB Charging Port |
| Button(s) | On/off button |
| Waterproof | No |
| Memory card | No |
| Flight performance: | |
| Flying distance | 100 m (328 feet) |
| Maximum height | 10 m (33 feet) |
| Speed | 28.6 km/h (17.8 mph) |
| Flight time | 13 minutes (zero wind conditions) |
| Flight modes | 8D Flips, Up & Away, Throw & Go, 360 mode, Circle mode, Bounce Mode |
| Fly indoor | Yes (recommended) |
| Fly outdoors | Yes, but only in calm conditions without wind |
| Flight Battery: | |
| Type | LiPo, Rechargeable, changeable |
| Power | 1100mAh, 3.8V, 4.18 Wh |
| Camera: | |
| Photo resolution | 2592 x 1936, 5 MP, 72 ppi |
| Photo format | JPG |
| Video resolution and framerate | HD: 1280x720, 30fps |
| Video format | MP4 |
| Stabilisation | Electronic Image Stabilisation (EIS) |
| Movable | No |
| Look down | No |
| Filters | No |
| Manual / Instructions: |
Where to buy
Check out the latest price, other user reviews, specs and availability on Amazon and DJI Store:


Conclusion
Great value for money!
-
Features
-
Easy of use
-
Flighttime
-
Footage quality
-
Value for money
Summary
If you are looking for an affordable, dummy-proof, and fun FPV drone that is easy to fly, this is it. I’m amazed that they have been able to incorporate all the sensors, processors and camera gear in such a tiny body, for that price. I didn’t buy this as my first drone, but I can recommend it to beginners who want to start droning.
Features like 8 direction flipping and automatic landing are stuff you find on more expensive quadrocopters. The photo and video quality are ok, but if you are serious about taking pictures and video you should consider a bigger and better copter like DJI Mavic Pro, Spark or Air.
The app works great and is easy to set up and understand. However, I recommend buying a Bluetooth controller that makes the craft much easier to operate. New colored covers are not necessary but something you can buy if you want.
I have had lots of fun flying the drone and the kids love it too! Please comment below if you have any other questions or experiences with this cool aircraft. Here is a list of other cool drones for children and beginners.
Video review will come very soon…


12 Comments
Hello 😉
Drones have really became much popular these days of our life and was thinking of even trying one myself, with this site you have help me know more about what i am about to get myself into, the explanations are simple and the pictures are clear and i even like the vs that really makes me understand the products much more in detail , will defiantly be coming here again.
Thank you.
Thanks for the comment Otis. 🙂
The price for this drone is right in the sweet spot for a graduation gift. Our son graduates from HS this year…and has voiced an interest in getting a drone. And since he already has an iPhone, this looks like the perfect fit.
I figure that if he really gets into drone, this is a great starter and then he can upgrade to a larger, more capable drone.
What are your thoughts on the video quality?
Also, it looks like the drone isn’t as much fun to fly (or as easy) without the controller. I think we’l spend the extra $30 for that as well!
Thanks for the helpful review.
Hi! The video quality is good for a drone at this size, but films only in 720p, not full HD or 4K as my larger drones. And the camera can not be tilted so it can only film in the flight direction. Electronic image stabilisation makes the picture more stable. You will see examples of video quality in the video review I will post soon.
I started using the drone without a controller, but I found it difficult to get full control when using the fingers on the smartphone. With sweaty fingers I didn’t get a good flow and I had to watch the smartphone screen all the time, and not the drone. With the physical joysticks that comes with a Bluetooth Remote controller, it’s much easier to get a good feel for the flight and be able to choose whether you want to watch the drone or the video transfer.
Andreas
I also agree that flying a cheap drone is quite difficult since I have seen many youtube videos and people are seriously having a hard time while flying one. So I really wonder how long it takes to learn to how to fly a drone and I am planning on doing it with a cheap one.
Hi, Furkan! The Tello is a good choice and easy to fly, at least with a remote controller. Not so easy with just the smartphone screen… And it can handle a fair share of crashes well. Andreas
I had a toy drone before i think it was a drone, not sure but it crashed on the first day. Meaning I just wasted a good amount of bucks. Thia drone review caught my eyes, and didnt think a drone like the DJI Tello can do so much, for example taking photos, i can use that for special event. Well great job on the review and keep up the good work.
Thanks for the comment Brian. I agree! It is so cool that you can do much more with these flying toys now than before. And they have become more versatile and easy to pack if you are going for a hike or trip to a big city or forest. You can take unusual pictures with the camera that was impossible a few years back.Andreas
Hi Andreas,
thank you so much for this wonderful, and very elaborate review. I couldn’t agree more with the idea of “cheap drones are the opposite of beginner drones” because all they do is scare you away: They are hard to fly, the overall quality is poor and at the end of the day, they cannot resemble the enjoyment that flying “real” drones brings.
I like that the DJI has these propeller guards which help you starting out, because crashes won’t immediately break your drone!
I like it, and I’ll definitely put this on my wishlist for my birthday 🙂
Cheers,
chris
Thanks for the great comment Chris. 🙂
Drones aren’t just meant to carry parcels for you or for recording of sights which you can’t see otherwise. You will be soon seeing them in the Need for speed as using them as racing drones is getting more and more common.
Thanks for the comment. 🙂 I’m building my first racing drone right now. 🙂 Andreas